
 Pin it
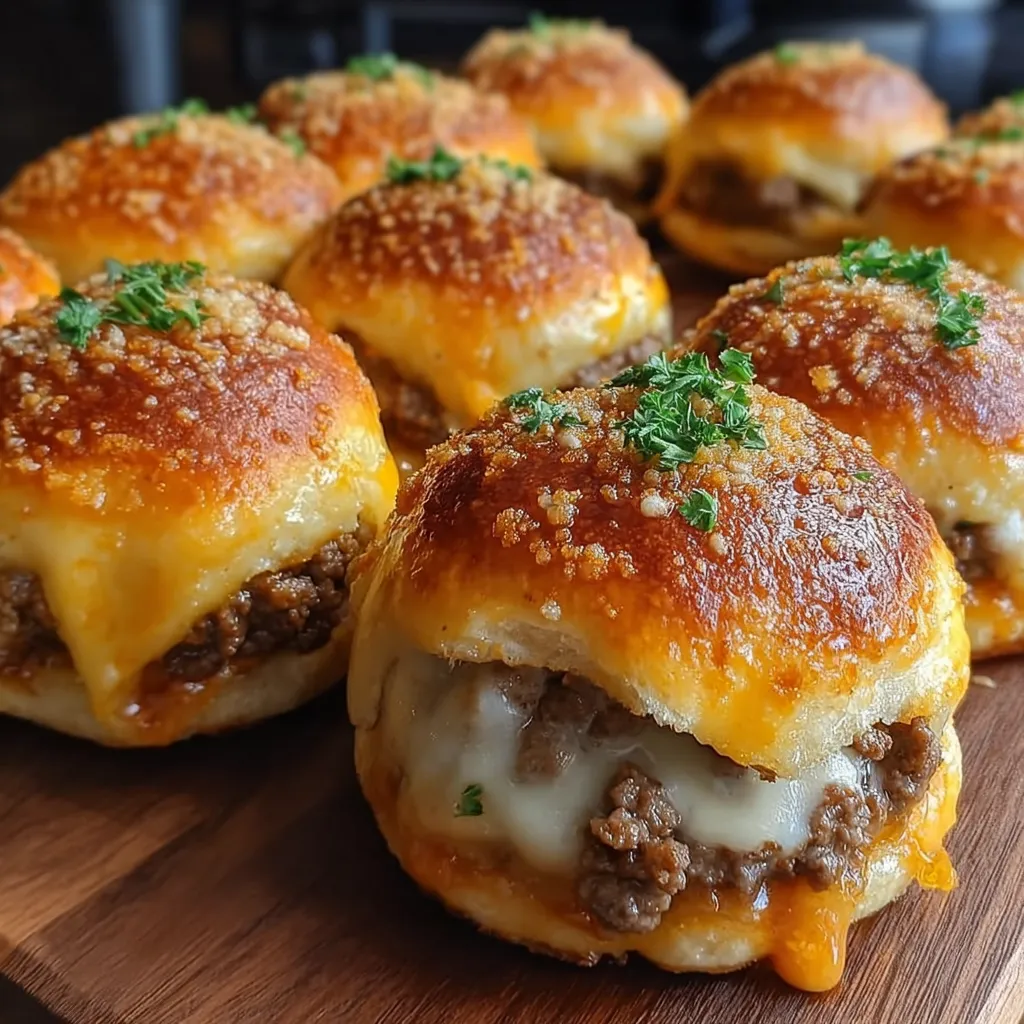
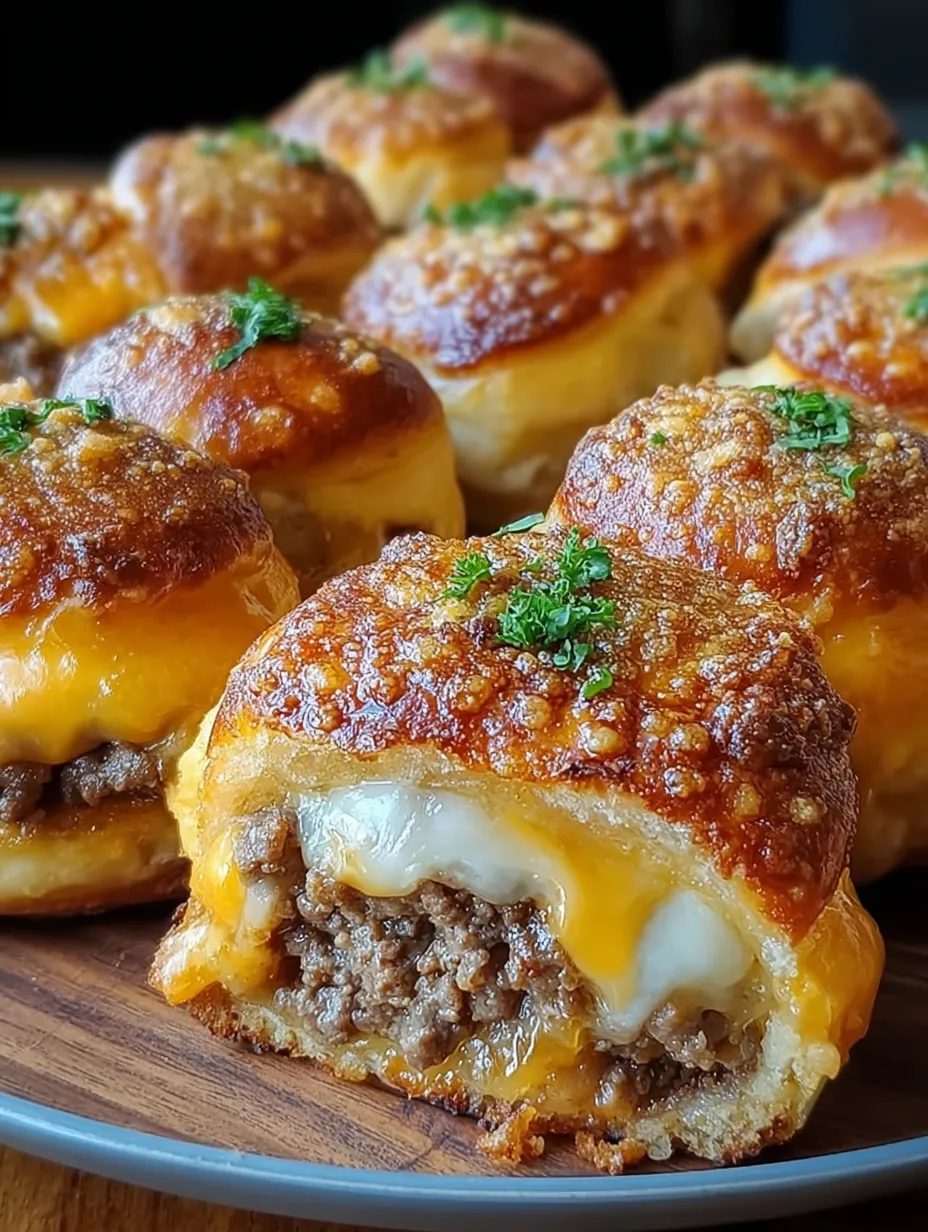
Garlic Parmesan Cheeseburger Bombs have become my go-to when I want something that wows guests without a ton of work. Each bite is packed with juicy seasoned beef and gooey cheese, all tucked inside a flaky golden crust and finished with garlicky butter and fresh Parmesan. They are party food perfection or a comforting weeknight treat that disappears fast around here.
I first tried these for a game night dinner and everyone kept reaching for seconds. Since then they have become my most requested potluck item for good reason.
Ingredients
- Ground beef: Look for eighty twenty beef for the best balance of flavor and moistness
- Salt, pepper, garlic powder, onion powder: These guarantee every bite is loaded with savory flavor
- Worcestershire sauce: Lends depth and a classic burger tang choose a brand with no extra sweeteners for best taste
- Shredded cheddar or mozzarella cheese: Use sharp cheddar for bold flavor or mozzarella for extra stretch always shred your own for smoothest melting
- Optional crispy bacon, pickles, caramelized onions: For custom burger bar vibes use your favorites or drizzle with a little barbecue sauce
- Refrigerated biscuit or pizza dough: Fresh dough from the fridge case makes this recipe a breeze. Press dough out evenly for best sealing
- Butter and minced garlic or garlic powder: Melted butter with real garlic is my secret for amazing flavor but powder works in a pinch
- Parmesan cheese, freshly grated: Only freshly grated Parmesan gives that signature salty cheesy finish. Pre-grated can turn oily in the oven
- Chopped fresh parsley for garnish: Adds a pop of color and freshness. Gets bonus points with guests
Step-by-Step Instructions
- Prepare the Burger Filling:
- Cook the ground beef over medium heat until fully browned, breaking it up as it cooks. Drain off extra fat then season generously with salt, pepper, garlic powder, onion powder and Worcestershire sauce. Let the mixture cool completely before stirring in shredded cheese. This keeps the dough easy to handle and creates a cohesive filling
- Shape the Bombs:
- Flatten each piece of biscuit or pizza dough into a four inch round. Using your fingers press the center a bit thinner. Place one to two tablespoons of cooled beef and cheese filling in the center. Now pinch the dough edges tightly together to seal. Try not to leave gaps. Roll gently to make a smooth ball
- Top and Arrange:
- Arrange the balls seam side down on a parchment lined baking sheet, spaced about two inches apart. Mix melted butter with minced garlic or garlic powder. Brush this mixture generously over each dough ball, then sprinkle the tops with fresh Parmesan cheese, pressing lightly so it sticks
- Bake:
- Heat the oven to three hundred seventy five degrees Fahrenheit. Once hot, bake the bombs for fifteen to eighteen minutes until golden brown and puffed up. The bottoms should sound hollow when tapped and the tops should be deeply golden
- Finish and Serve:
- Brush with any extra garlic butter when they come out of the oven. Sprinkle over fresh parsley if desired. Serve warm with dipping sauces like ranch, garlic aioli or spicy mayo. These taste best hot but are even good at room temperature
 Pin it
My favorite addition is crispy bacon inside the filling. Bacon makes everything better. This recipe always brings back memories of makeshift family picnics in the living room during winter storms – everyone gathered around a plate piled high with cheeseburger bombs.
Storage Tips
Store leftovers covered in the fridge for up to three days. Place in a single layer and reheat in the oven or air fryer for best texture. They freeze beautifully wrapped individually in foil or plastic then warmed at three hundred fifty degrees Fahrenheit until heated through. Each bomb tastes just as good after reheating as the day it was made.
Ingredient Substitutions
Swap ground chicken, turkey or even plant-based crumbles for beef for a lighter twist. Use any favorite cheese that melts well, such as gouda, pepper jack or Swiss. To make gluten free, look for specialty refrigerated doughs available in most stores. If you want a vegetarian option, stuff with sautéed mushrooms and spinach instead.
Serving Suggestions
Serve with classic burger toppings and a variety of dipping sauces like ketchup, honey mustard or sriracha mayo. For bigger meals, pair with a crisp slaw or baked potato wedges. Kids love them with carrot sticks and ranch. These also make a big impression when arranged on a platter for game days or backyard parties.
A Little History
These are inspired by classic cheeseburger sliders and stuffed breads found in American diners. A clever way to get all the best burger flavors in a portable form, the idea is rooted in southern biscuit culture and the trend of stuffed pull-apart breads. No matter the name, these bombs hit every nostalgic note of comfort food.
Frequently Asked Questions
- → How can I keep the dough from tearing during assembly?
Ensure the filling is completely cooled before assembling. Gently stretch and flatten the dough evenly to prevent tears.
- → Can I prepare these ahead of time?
Yes, you can assemble them in advance and refrigerate until ready to bake. This makes them perfect for entertaining!
- → What are some good dipping sauces to serve with these?
Great options include ranch dressing, garlic aioli, spicy mayo, or even ketchup for a classic touch.
- → How do I store leftovers?
Store leftovers in an airtight container in the refrigerator. Reheat them in the oven or air fryer for the best texture.
- → Can I customize the filling?
Absolutely! Try adding cooked bacon, diced jalapeños, caramelized onions, or even swapping ground beef for sausage or turkey.
- → Can these be frozen for later use?
Yes, they freeze well. Place the cooled bombs in a freezer-safe container and reheat directly in the oven or air fryer when needed.