
 Pin it
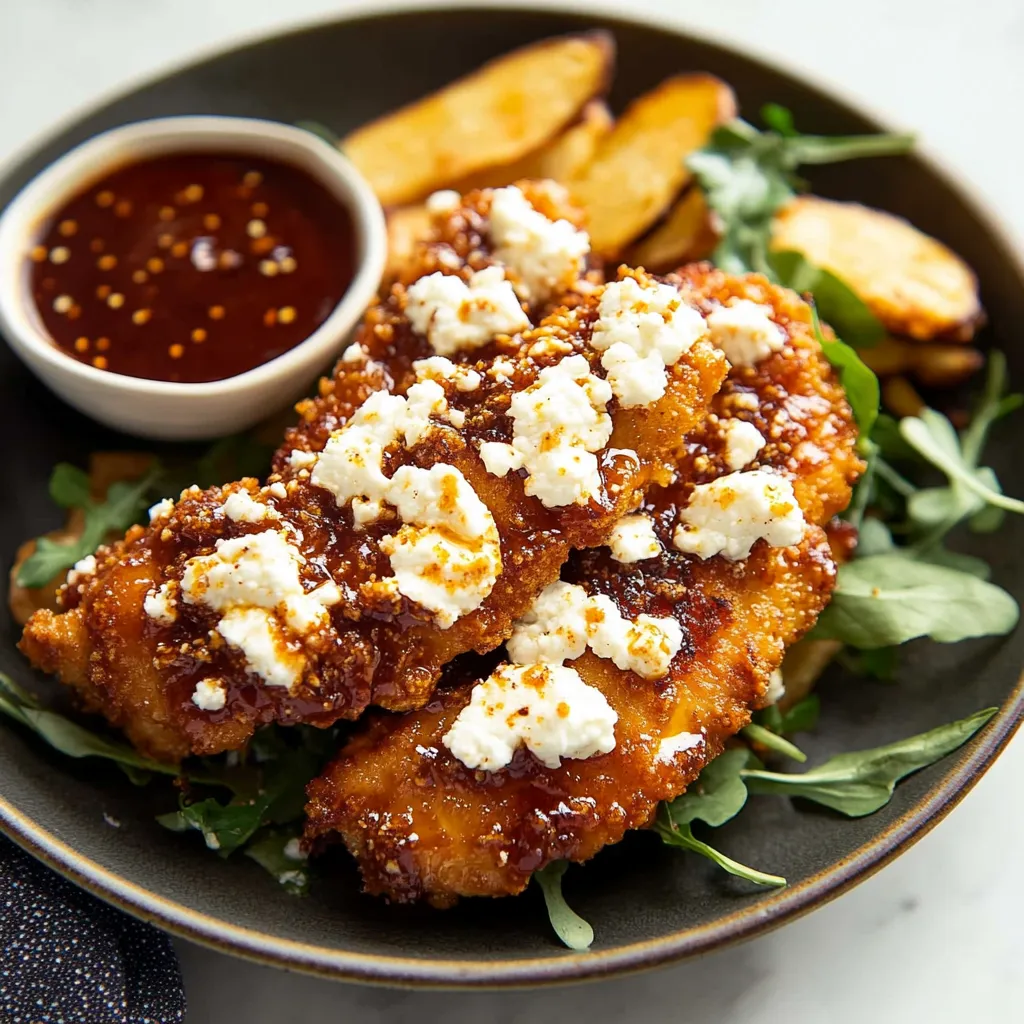
Crispy Hot Honey Feta Chicken transforms ordinary chicken breasts into an extraordinary dinner experience. The combination of crispy panko coating, creamy feta cheese, and sweet-spicy honey drizzle creates layers of flavor and texture that make this dish utterly irresistible. This Mediterranean-inspired recipe delivers restaurant-quality results with surprisingly little effort, perfect for those nights when you want something special without spending hours in the kitchen.
I stumbled upon this recipe during a particularly busy week and was blown away by how something so simple could taste so complex. My family now requests this "fancy chicken" regularly, and guests always ask for the recipe when I serve it at dinner parties.
• Ingredients and Why They Matter:
- Chicken Breasts: The foundation of our dish. Slicing them horizontally creates thinner pieces that cook quickly and evenly while maximizing the crispy coating-to-meat ratio.
- Panko Breadcrumbs: Japanese-style breadcrumbs that create a lighter, airier coating that stays crispier than regular breadcrumbs. Worth seeking out for superior texture.
- Feta Cheese: Provides a tangy, salty creaminess that balances the sweet honey. Choose a block feta packed in brine rather than pre-crumbled for better moisture and flavor.
- Honey: Forms the base of our sauce. Use a good quality honey as its flavor will shine through. Floral varieties like orange blossom work beautifully here.
- Hot Sauce: Adds vinegary tang and heat to the honey. Frank's or Cholula bring complexity, not just heat.
- Chili Flakes: Provide a more direct spiciness and beautiful red flecks throughout the honey.
- Seasonings: The blend of paprika, oregano, garlic and onion powders creates depth of flavor in the coating without overwhelming the dish.
Step-by-Step Cooking Instructions:
- 1. Prepare the Hot Honey
- Take your honey, hot sauce, and chili flakes and combine them in a microwave-safe bowl. Heat for about 20 seconds just until the honey thins slightly, making it easier to blend everything together. Stir well and set aside to cool. This warming step helps the flavors meld more quickly and deeply. The honey will thicken again as it cools, creating the perfect consistency for drizzling later.
- 2. Prepare the Chicken
- Lay each chicken breast flat on your cutting board and, with your palm stabilizing the top, carefully slice horizontally through the middle to create two thinner pieces of equal thickness. This technique not only helps the chicken cook more quickly and evenly but also creates more surface area for the crispy coating. Mix all your dry seasonings together in a small bowl - this ensures even distribution of flavors.
- 3. Create the Coating Station
- Set up your breading station with three shallow dishes in a row: first dish with flour and half the seasoning mix, second with beaten eggs, and third with panko breadcrumbs mixed with the remaining seasonings. Having everything lined up streamlines the process and contains the inevitable mess. Place a large tray at the end to hold your coated chicken pieces.
- 4. Coat the Chicken
- Working with one piece at a time, thoroughly dredge the chicken in the seasoned flour, ensuring complete coverage and shaking off any excess. Next, submerge it fully in the beaten egg, allowing any extra to drip off. Finally, press it firmly into the seasoned panko, turning and patting to make sure every bit of surface is completely covered with breadcrumbs. Place on your waiting tray and repeat with remaining pieces.
- 5. Fry to Perfection
- Heat enough vegetable oil to generously coat the bottom of a large pan over medium-high heat. Test the temperature by dropping in a breadcrumb - when it sizzles immediately, the oil is ready. Carefully place the breaded chicken pieces in without overcrowding (work in batches if needed). Fry for 3-4 minutes per side until deeply golden and crispy, monitoring the heat to prevent burning. The center should be white and reach 165°F.
- 6. Add the Feta Topping
- Transfer the fried chicken to a wire rack placed over a baking sheet to maintain crispiness. Crumble feta cheese generously over each piece, covering as much of the surface as possible. Place under a preheated broiler until the feta begins to soften and develop golden spots - about 2-3 minutes. Watch carefully as broilers can burn food quickly.
- 7. Serve and Drizzle
- Transfer each piece to individual serving plates, drizzle generously with your prepared hot honey, and serve immediately while the contrast between crispy coating and melty cheese is at its peak. The warm chicken will slightly thin the honey, creating the perfect consistency to seep into all the nooks and crannies.
My youngest son was the pickiest eater until he tried this chicken. The honey was the initial draw, but the combination of crispy coating and tangy feta won him over completely. Now he helps me make the hot honey, carefully measuring the chili flakes and proudly declaring when it's "just right" for our family's taste.
The Secret to Perfect Crispiness
Achieving restaurant-quality crispiness at home comes down to three key factors: proper coating technique, oil temperature, and post-frying handling. When coating your chicken, press the breadcrumbs firmly onto the surface to create a solid layer that won't flake off during cooking. Using a thermometer to maintain your oil at around 350°F ensures that the coating crisps quickly without absorbing excess oil. Perhaps most importantly, allowing the fried chicken to rest on a wire rack rather than paper towels prevents steam from softening the underside. These simple but critical steps make all the difference between soggy disappointment and crunchy perfection.
Make-Ahead and Storage Tips
This Crispy Hot Honey Feta Chicken can be partially prepared ahead of time to make weeknight cooking easier. The hot honey can be made up to two weeks in advance and stored in an airtight container in the refrigerator – just warm it slightly before serving to restore its pourable consistency. The chicken can be breaded and refrigerated, uncovered, for up to four hours before frying, which actually helps the coating adhere better during cooking. If you have leftovers, store them in the refrigerator and reheat in a 350°F oven on a wire rack for about 10 minutes to restore some crispness. The texture won't be identical to fresh, but the flavor remains delicious.
Variations to Try
While this recipe is spectacular as written, it's also wonderfully adaptable to different tastes and dietary needs. For a gluten-free version, substitute the flour with rice flour and use gluten-free panko, which is now widely available. The dish takes on a delicious Mediterranean twist if you replace the paprika with za'atar and add some lemon zest to the breadcrumbs. For those who prefer less spice, omit the cayenne and reduce the chili flakes in the honey, perhaps adding a touch of orange zest for a different flavor profile. During summer months, I've even topped the finished dish with diced tomatoes and cucumbers for a fresh contrast to the rich chicken. The versatility of this recipe is part of what makes it a staple in my cooking rotation.
Frequently Asked Questions
- → Can I bake the chicken instead of frying it?
Yes! Pre-toast the breadcrumbs, coat the chicken, and bake at 220°C/430°F for 18-20 minutes, flipping midway, until crispy and cooked through.
- → How can I adjust the spice level of the hot honey?
To increase spice, add more chili flakes or hot sauce. To reduce spice, use less or balance with plain honey.
- → Can I prepare the hot honey ahead of time?
Absolutely! Make the hot honey, allow it to cool, and store it tightly covered in the fridge for up to 1 week.
- → What side dishes go best with this meal?
Pair the chicken with arugula/rocket salad, potato wedges, or your favorite roasted vegetables for a complete meal.
- → How can I ensure the chicken is cooked thoroughly?
Ensure the chicken is golden on the outside and reaches an internal temperature of 75°C/165°F for safe consumption.