
 Pin it
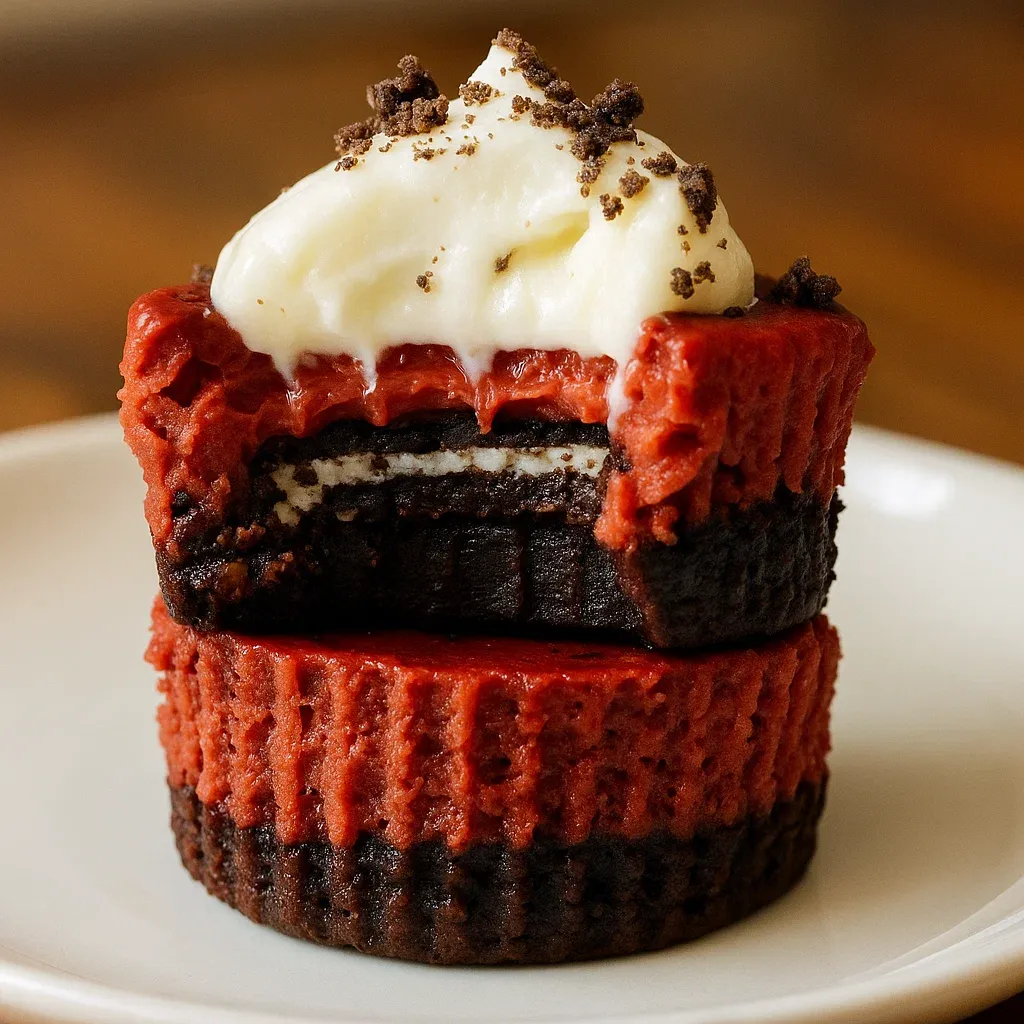
This mini red velvet brownie cheesecake recipe combines three heavenly layers for a decadent dessert that looks as impressive as it tastes. The fudgy brownie base cradles a hidden Oreo surprise, all topped with a silky red velvet cheesecake layer and finished with cream cheese whip.
The first time I made these for a Valentine's Day party, they disappeared faster than any other dessert. Now they're requested at every family gathering, and I've even started making them with holiday-colored Oreos for seasonal celebrations.
Ingredients
- Unsalted butter: Provides richness to both brownie base and cream cheese topping. Always use unsalted to control salt content.
- Cream cheese: Creates that signature tangy cheesecake flavor. Philadelphia brand works best for its consistent texture.
- Cocoa powder: Appears in both brownie and cheesecake layers. Use Dutch-processed for deeper color and less bitter taste.
- Red food coloring: Gives that classic red velvet hue. Gel food coloring offers more concentrated color with less liquid.
- Oreo cookies: Add texture contrast and hidden surprise. Feel free to use regular or gluten-free versions depending on dietary needs.
- Sour cream: Adds moisture and tang to the cheesecake layer. Full-fat works best for creamiest results.
Step-by-Step Instructions
- Prepare the Brownie Base:
- Begin by preheating oven to 350°F and lining a cupcake tin with paper liners. Vigorously whisk egg and sugar until the mixture turns pale and frothy about one minute. This step creates that perfect brownie texture so dont rush it. Add slightly cooled melted butter and vanilla to the mixture ensuring butter isnt hot enough to cook the eggs. Switch to a spatula and gently fold in cocoa powder flour and salt until you achieve a thick fudgy consistency. Transfer to a piping bag for easy distribution into cupcake liners about 1½ tablespoons per cup then spread evenly with the back of a spoon.
- Quick Prebake and Oreo Addition:
- Bake brownies for just 5 minutes to set the base slightly without completely cooking them. Lower oven temperature to 325°F immediately after removing them this temperature change is crucial for perfectly baking the cheesecake layer. After cooling the brownie base for about 5 minutes gently press an Oreo cookie into each cup creating that surprise middle layer that everyone loves.
- Create Perfect Red Velvet Cheesecake:
- Beat room temperature cream cheese and sugar until completely smooth scraping bowl thoroughly. Add sour cream egg and vanilla mixing until well incorporated. Cocoa powder goes in next followed by red food coloring starting at low speed to prevent splattering. Pipe the vivid red batter over each Oreo and brownie base filling cups nearly to the top. Tap the pan gently to remove air bubbles and level the surface.
- Two-Stage Baking Method:
- Bake for 12 minutes at 325°F then turn off oven leaving cheesecakes inside for 5 more minutes. This gradual cooling prevents cracks and creates that perfect cheesecake texture slightly puffed with just the slightest center indent. Cool at room temperature before refrigerating for minimum 2 hours the patience pays off with perfect texture.
- Whipped Topping Finale:
- Whip cream cheese and butter until fluffy then add powdered sugar for structure and sweetness. The heavy cream and vanilla transform the mixture into a light cloud of frosting. Pipe decorative dollops on chilled cheesecakes and sprinkle with crushed Oreos for the perfect finishing touch.
 Pin it
The hidden Oreo inside these cheesecakes is my favorite part. I discovered this trick by accident when trying to use up extra cookies, and now my family considers it the signature element. My daughter calls them "treasure chest cheesecakes" because of the surprise inside.
Make Ahead and Storage Tips
These mini cheesecakes actually benefit from overnight refrigeration as the flavors meld beautifully. Store them in an airtight container in the refrigerator for up to 5 days, though they rarely last that long in my house. The texture is best when allowed to sit at room temperature for about 15 minutes before serving.
For longer storage, you can freeze these treats without the whipped topping. Place in a single layer in a freezer container and freeze for up to 3 months. Thaw overnight in the refrigerator, then add fresh cream cheese whip before serving.
Troubleshooting Tips
If your cheesecakes develop cracks, the oven temperature was likely too high or they were overbaked. Always ensure all ingredients are at room temperature before mixing, as cold ingredients cause uneven baking. Remember that mini cheesecakes will continue cooking slightly after removal from the oven.
For perfect red velvet color without excessive food coloring, start with room temperature ingredients and mix the cocoa powder thoroughly before adding coloring. The reaction between cocoa and vinegar in traditional red velvet helps enhance the red color naturally.
Serving Suggestions
These mini cheesecakes make a stunning presentation on a tiered dessert stand. For special occasions, drizzle with chocolate sauce or add fresh berries alongside the Oreo crumbles. I often serve them with coffee after dinner parties, or pack them individually for bake sales and potlucks.
For a festive holiday touch, match the Oreo filling color to the season. Red filling for Christmas, orange for Halloween, or pastel colors for spring celebrations create a fun surprise when guests bite into them.
Frequently Asked Questions
- → Can I use gluten-free ingredients for this dessert?
Yes, you can substitute the all-purpose flour and Oreos with gluten-free alternatives to make this dessert gluten-free.
- → How long should these cheesecakes chill before serving?
Chill the cheesecakes for at least 2 hours or overnight for the best texture and flavor.
- → Can I omit the red food coloring?
Yes, you can skip the red food coloring. The taste will remain the same, though the cheesecakes won't have the red velvet color.
- → How do I store these cheesecakes?
Store the cheesecakes in an airtight container in the refrigerator for up to 5 days.
- → Can I make these cheesecakes ahead of time?
Yes, you can prepare these up to 2 days in advance. Add the cream cheese whip and crushed Oreos just before serving.